Deepdive
Role-Based Access Control (RBAC) is a method of regulating access to resources based on the roles assigned to users within your directory. By defining roles and associated permissions, you can control what actions users can perform and what data they can access.
This guide provides a deep dive into configuring and utilizing basic RBAC within your application, ensuring that all RBAC-related information is centralized for your convenience.
RBAC allows you to:
- Define Roles: Categories or groups that represent a set of users (e.g., Listing-Creator, Visitor).
- Define Permissions: Specific actions or access rights within the application (e.g., Create Post, See Coupon).
- Assign Permissions to Roles: Map what each role is allowed to do.
- Assign Roles to Users: Determine what role(s) a user belongs to upon signup or through admin assignment.
The core of the RBAC system lies within the rbac_config.ts file. This is where you define roles, permissions, and the relationships between them.
Roles represent different user categories in your application. They are defined using the Roles enumeration.
1export enum Roles {
2	ROLE_A = 'ROLE_A',
3	ROLE_B = 'ROLE_B',
4	ROLE_C = 'ROLE_C',
5	// Add other non-admin roles as needed
6}CAUTION
The admin role is a special role and should not be selectable by the user during signup.
Permissions are the actions or access rights that can be granted to roles.
1export enum Permissions {
2	MANAGE_LISTING = 'MANAGE_LISTING',
3	MANAGE_SUBLISTING = 'MANAGE_SUBLISTING',
4	MANAGE_BLOG_POST = 'MANAGE_BLOG_POST',
5	MANAGE_INQUIRIES = 'MANAGE_INQUIRIES',
6	CREATE_INQUIRIES = 'CREATE_INQUIRIES',
7	MANAGE_PROMOTIONS = 'MANAGE_PROMOTIONS',
8	MANAGE_ACCOUNT_SETTINGS = 'MANAGE_ACCOUNT_SETTINGS',
9	ACCESS_DASHBOARD = 'ACCESS_DASHBOARD',
10	ACCESS_COUPON = 'ACCESS_COUPON',
11	// Add other permissions as needed
12	ACCESS_XYZ = 'ACCESS_XYZ',
13}CAUTION
Admin permissions are handled with a different logic to secure admin actions. It is not recommended to secure admin actions using these RBAC permissions.
Assign permissions to each role by defining the rolePermissions object.
1export const rolePermissions: Record<Roles, Permissions[]> = {
2	[Roles.ROLE_A]: [
3		Permissions.MANAGE_BLOG_POST,
4		Permissions.MANAGE_LISTING,
5		Permissions.MANAGE_SUBLISTING,
6		Permissions.MANAGE_INQUIRIES,
7		Permissions.MANAGE_PROMOTIONS,
8		Permissions.MANAGE_ACCOUNT_SETTINGS,
9		Permissions.ACCESS_DASHBOARD,
10	],
11	[Roles.ROLE_B]: [
12		Permissions.MANAGE_ACCOUNT_SETTINGS,
13		Permissions.ACCESS_DASHBOARD,
14		Permissions.CREATE_INQUIRIES,
15		Permissions.ACCESS_COUPON,
16	],
17	// Add other role-permissions-relations as needed
18	[Roles.ROLE_C]: [],
19};Customization: You can add or remove permissions for each role as per your directory's requirements.
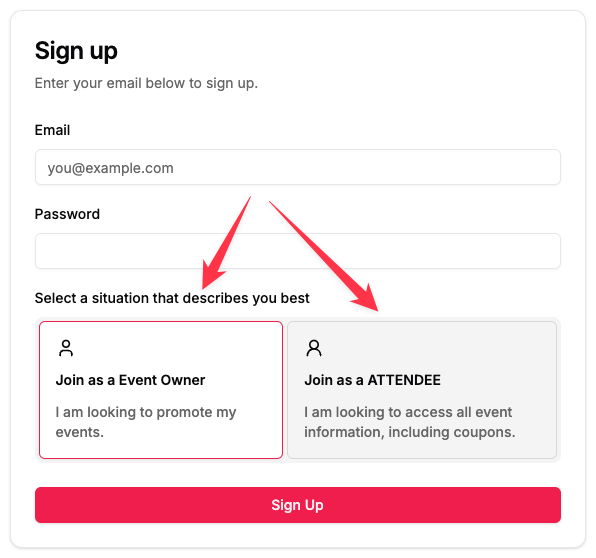
Define the roles that users can select during the signup process using the signupOptions array.
1export const signupOptions = [
2	{
3		title: 'Join as a Event Owner',
4		description: 'I am looking to promote my events.',
5		lucide_icon: UserIcon,
6		internalCode: Roles.ROLE_A,
7	},
8	{
9		title: 'Join as a ATTENDEE',
10		description:
11			'I am looking to access all event information, including coupons.',
12		lucide_icon: User2Icon,
13		internalCode: Roles.ROLE_B,
14	},
15	// Add other non-admin-roles as needed - which can be selected by the user
16];The above code, when RBAC is used, will lead to the following signup page.

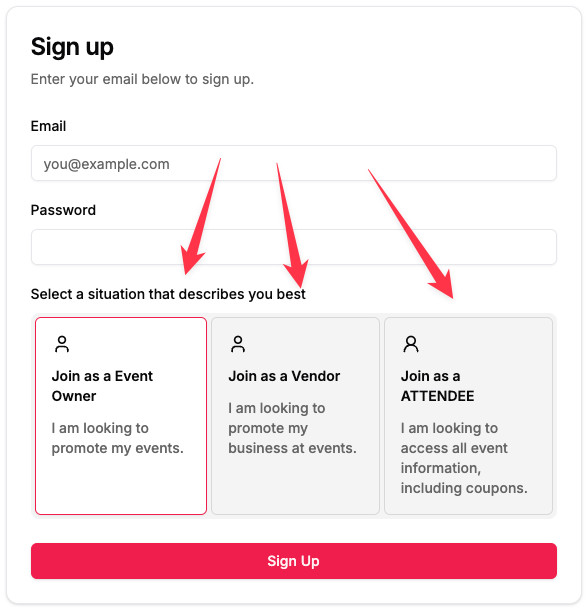
You can also have more than 2 roles like the following image shows:

CAUTION
Note: Admin roles should not be included here, as they are typically assigned internally and not selectable by end-users.
Use the userHasPermission function to check if a user has a specific permission.
1export function userHasPermission(
2	userRole: Roles,
3	permission: Permissions
4): boolean {
5	if (GENERAL_SETTINGS.USE_RBAC === false) return true;
6	const permissions = rolePermissions[userRole] || [];
7	return permissions.includes(permission);
8}NOTE
The line "if (GENERAL_SETTINGS.USE_RBAC === false) return true;" refers to the feature flag and some example snippets in the code. See below for more info on this.
Usage: Before performing an action or rendering a component, call this function to verify if the user has the necessary permission. See the example section next.
RBAC was introduced as a core element in version 1.1.3 of the template.
To use it, activate the feature flag in constants.ts by setting the USE_RBAC property in GENERAL_SETTINGS.
1const GENERAL_SETTINGS = {
2	// Enable or disable Role-Based Access Control (RBAC)
3	// If set to false, all users will have the same rights.
4	// If set to true, there are two default user roles:
5	// - Users who can create listings and perform other actions.
6	// - Users who can only change their account settings and view coupon codes on listings (if available).
7	// You can adapt user roles and permissions as needed. See `constants/rbac_config.ts` for more information.
8	USE_RBAC: true,
9};NOTE
The boilerplate template includes code snippets in regards to RBAC. If you turn it off by setting it to false, as with other feature flags, the snippets will remain in your code but are deactivated. When you want to optimize your code for scaling purposes, you can remove any such snippets.
After activating, you can have several options to protect actions, pages, components or parts of components.
Per default, the following will happen once activated:
- 2 user roles can signup
- 1 can basically do anything (except admin stuff)
- 1 can basically do nothing but access coupons - if there are any attached to a listing. When logged in, they will also only see the option to change their own account settings. They further see a non-kpi dashboard.
Customize what you need for your directory with the following examples. If you need more, contact us through github.
Instead of redirecting, display a custom "AccessDenied" component to inform users they lack the necessary permissions.
Example:
1if (!userHasPermission(currentUser.role, Permissions.CREATE_POST)) {
2	return <AccessDenied />;
3}
4// Render the protected page componentUse the userHasPermission function to conditionally display elements, such as the coupon example. Here it will only be shown to users who have the explicit permission to ACCESS_COUPON.
Example:
1if (
2	GENERAL_SETTINGS.USE_RBAC &&
3	(!user ||
4		!user.role ||
5		!userHasPermission(user.role as Roles, Permissions.ACCESS_COUPON))
6) {
7	return <p className="text-xs italic p-1">Login to see discount code.</p>;
8}
9
10return (
11	!!listing.discount_code_percentage && (
12		<div className="bg-light-red-bg text-text-on-light-red whitespace-nowrap h-fit p-1 rounded-md text-sm font-medium items-center hidden md:flex">
13			<BadgePercentIcon size={14} className="mr-1" />
14			{listing.discount_code_percentage} % off
15		</div>
16	)
17);Protect certain elements in a list (such as navigation links) to ensure they are only visible if the user has the appropriate permissions.
Example:
1const navLinks = [
2{ name: 'Dashboard', permission: Permissions.ACCESS_DASHBOARD },
3{ name: 'Create Post', permission: Permissions.MANAGE_BLOG_POST },
4{ name: 'Coupons', permission: Permissions.ACCESS_COUPON },
5];
6
7return (
8
9{' '}
10<nav>
11	<ul>
12		{navLinks.map((link) =>
13			userHasPermission(currentUser.role, link.permission) ? (
14				<li key={link.name}>{link.name}</li>
15			) : null
16		)}
17	</ul>
18</nav>
19);With RBAC, your directory can support more complex relationships between user roles and their allowed actions. Here are some real-world examples and use cases that demonstrate the power of this feature:
- Role A (Event Organizer): Can create event listings, including all event details.
- Role B (Vendor): Can create sublistings under events, such as vendor booths, food stalls or merchandise stands that are part of an event.
- Role C (Attendee): Can browse events, sign up to leave their email address, and participate in prize draws or other attendee-focused activities.
- Role A (Hiring Company): Can create listings for their company and manage job postings under each listing.
- Role B (Job Seeker): Can browse company listings, view open positions, and apply to jobs.
- Role A (Restaurant Owner): Can create a listing for their restaurant, including details like menus, operating hours, and promotions.
- Role B (Customer): Can browse restaurant listings, view menus, and make reservations. (Disclaimer: As of time of writing, the template does not include a reservation system.)
- Role A (Freelancer): Can create a listing showcasing their skills, experience, and services.
- Role B (Agency): Can browse freelancer profiles, make inquiries, and hire freelancers for projects.
- Role A (Gym Owner): Can create a listing for their gym, including details like facilities, classes offered, and membership options.
- Role B (Fitness Trainer): Can create sublistings under gyms, such as personal training sessions or group classes.
- Role C (Gym Member): Can browse gym listings, view trainer profiles, and sign up for classes.
- Role A (Gallery Owner): Can create listings for their gallery, including exhibitions and featured artists.
- Role B (Artist): Can create sublistings under galleries, showcasing individual pieces or collections.
- Role C (Visitor): Can browse galleries, view artist profiles, and inquire about artwork.
These examples illustrate how you can use multiple roles to create a dynamic and scalable directory, allowing different user types to interact in meaningful ways while keeping control over the data flow and permissions.
By following this guide, you can effectively implement and manage RBAC within your directory. When you have any questions or find issues, please post them in GitHub.

